Reverse Engineering with Ghidra SRE
Ghidra SRE is used as the main reverse engineering platform. All instructions and tools presented on the site are designed to work with Ghidra.
This guide will help you dive into the world of reverse engineering in just a few steps.
Since around 2019, there has been a bug in Ghidra SRE: FF FF in the v5t architecture is recognized as the BL 0xFFE instruction. This causes an infinite loop in auto-analysis.
You must apply the ARMTHUMBinstructions.sinc patch if you plan to work with Siemens firmware.
What to Do Before Starting
-
Install the latest version of Ghidra SRE and apply the ARMTHUMBinstructions.sinc patch
-
Obtain the fullflash from the phone and remove FFS and EEPROM from it.
This is important for auto-analysis, as FFS and EEPROM contain ambiguous data that can be interpreted as instructions.
You can download a collection of firmware with FFS and EEPROM already removed: fullflashes.zip
Step 1: Load Your fullflash.bin into Ghidra
Details
-
Launch the disassembler and select
File -> Import File -
Select the
fullflash.binfile -
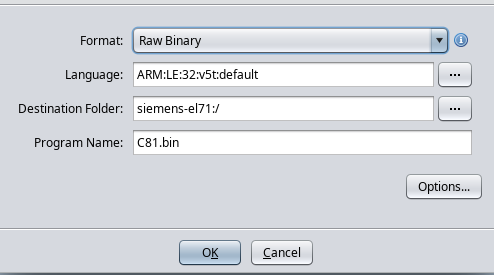
Configure import settings:
- Format:
Raw Binary - Language:
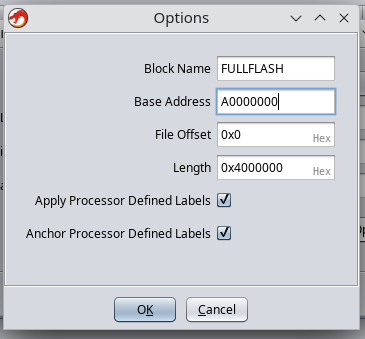
ARM v5t 32 little - Options → Block Name:
FULLFLASH - Options → Base Address:
A0000000
- Format:
-
Click on
fullflash.binin the project list. -
Ghidra will offer automatic analysis, you need to decline (click No).
Step 2: Edit FULLFLASH Region Attributes
Go to Window -> Memory Map and set the attributes for the "FULLFLASH" block:
 R   W   X    Volatile
[x] [ ] [x]     [ ]
It is very important to uncheck W, as this directly affects decompilation.
Step 3: Configure Auto-Analysis Settings
-
Select
Analysis -> Auto Analyse -
Change analysis settings:
Disable:
-
Embedded media -
Non-returning functions - discovered(otherwise the disassembler may prematurely stop inside a function) -
Create Address Tables(better to run as one-shot after main analysis) -
Demangler GNU
Enable:
-
Scalar operand references -
Shared return callswith option[x] Allow conditional jumps
-
-
Click "APPLY" but DO NOT CLICK "ANALYZE"!!!
-
Close the analysis window.
Step 4: Memory Region for IO Registers
Details
-
Go to
Window -> Memory Map -
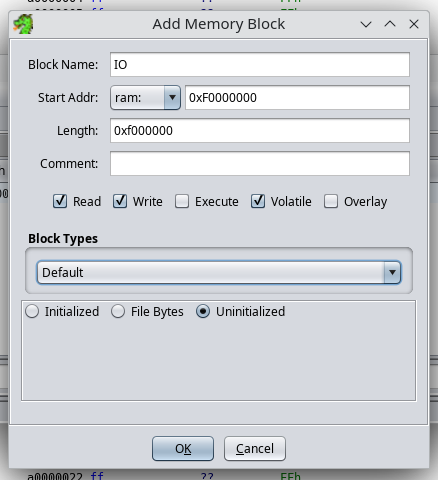
Add a new region with parameters:
- Block Name:
IO - Start Addr:
0xF0000000 - Length:
0x0F000000 - Attributes:
[x] Read [x] Write [ ] Execute [x] Volatile [ ] Overlay - Uninitialized
- Block Name:
Step 5: Import RAM Dump from the Phone
Import all previously obtained memory dumps.
Example with RAM:
-
File -> Add to Program -
Select a file, for example:
C81v51_RAM_A8000000_00800000.bin -
Specify parameters:
- Block Name:
RAM - Base Addr:
0xA8000000
Click "OK".
- Block Name:
-
Go to
Window -> Memory Mapand set attributes for the "RAM" block:R W X Volatile
[x] [x] [x] [ ]
Step 6: Plugins for Ghidra
Details
- Download: ghidra_scripts.zip or clone the repository
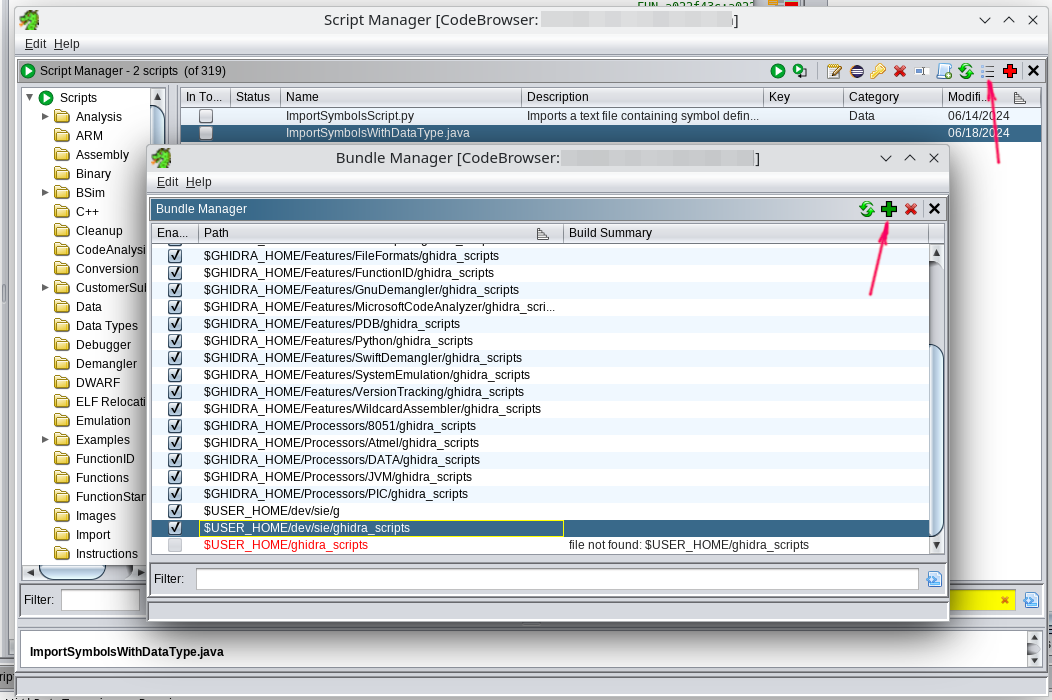
- Open
Window -> Script Manager - Click on "Manage Script Directories"
- Add the path to the unpacked
ghidra_scriptsfolder.
Step 7: Import C-Types from swilib
Details
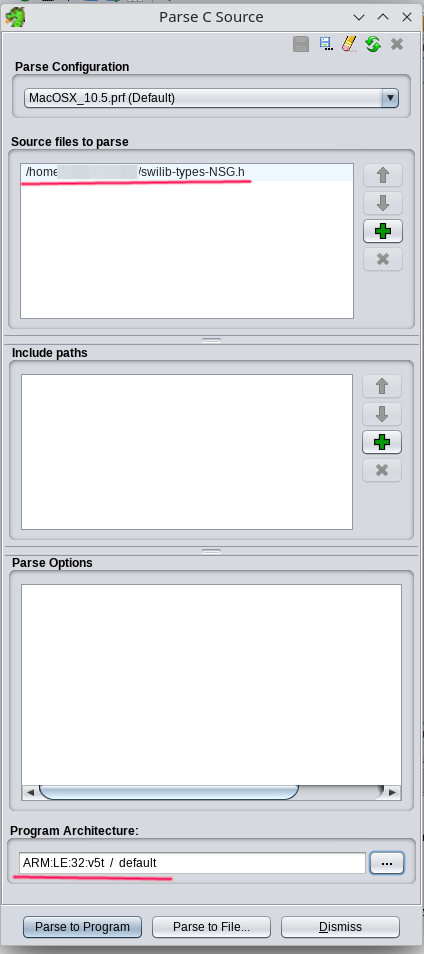
- Download the appropriate
swilib-types-PLATFORM.hfrom Swilib data types for disassembler - Select
File -> Parse C Source... - Click
Clear profile(eraser icon) - Add
swilib-types-PLATFORM.htoSource files to parse - Set
Program architecture:ARM v5t 32 little - Click
Parse to Program -> Continue -> Don't use Open Archives -> OK
Step 9: Import CPU IO Register List
- Download the corresponding
cpu-PHONE.txtorcpu-pmb887x.txtfrom CPU IO registers - Open
Window -> Script Manager -> ImportSymbolsWithDataType.java -> Run Script - Select
cpu-PHONE.txtorcpu-pmb887x.txt
Step 10: Import swilib Symbols
Details
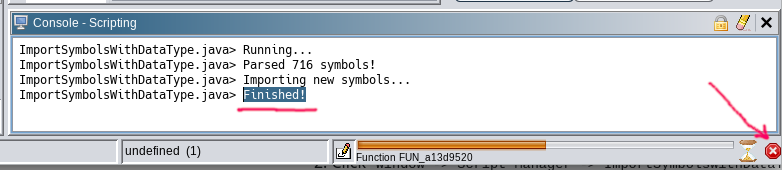
- Download the appropriate
symbols-PHONE.txtfrom Firmware symbols for disassembler - Open
Window -> Script Manager -> ImportSymbolsWithDataType.java -> Run Script - Select
symbols-PHONE.txt
This will take some time as auto-analysis will start.
When you see "Finished" in the script console — you can interrupt the analysis and proceed further.
Step 11: Firmware Auto-Analysis
Full Analysis
- Open
Analysis -> Auto Analyse 'fullflash.bin' - Ensure the settings match those specified in Step 3
- Click ANALYSE
This will take 10-30 minutes. The process is long — be patient.
Run Only Once
- Select
Analysis -> One-shot -> Create Address Tables
Congratulations, You Did It! ✨
We look forward to your patches in the patch database patches.kibab.com :)