How to reverse engineering Siemens in 2k24?
Prerequisites:
-
Install Ghidra SRE v11.1.1 and fix
ARMTHUMBinstructions.sinc.Since about 2019 there has been a bug in Ghidra SRE where
FF FFis treated as anBL 0xFFEinstruction in v5t architecture. This causes an infinity loop in auto-analysis.You should apply patch ARMTHUMBinstructions.sinc if you want to work with Siemens firmwares.
-
Obtain fullflash from your phone and remove FFS & EEPROM from it.
This is important for auto-analysis, beacause FFS and EEPROM contain ambiguous data which can be treated as instructions.
You can download a collection of the fullflashes with already removed FFS and EEPROM: fullflashes.zip.
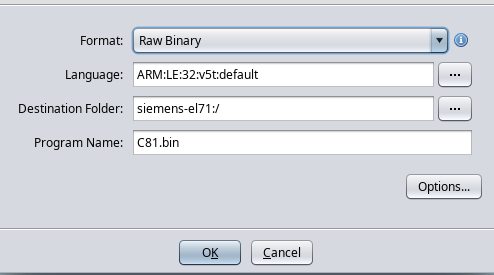
Step 1: Open fullflash in the Ghidra
- Run the disassembler and click:
File -> Import File - Select your fullflash.bin
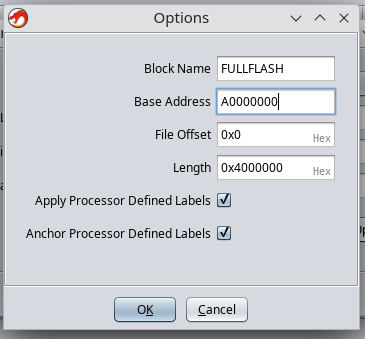
- Choose the appropriate disassembler settings:
- Format:
Raw Binary - Language:
ARM v5t 32 little - Options -> Block Name:
FULLFLASH - Options -> Base Address:
A0000000
Sreenshot
- Format:
- Then click on
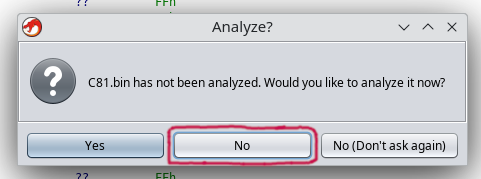
fullflash.binin the project files. - Reject automatic analysis (press No).
Screenshot
Step 2. Fix attributes for FULLFLASH memory region
Click Window -> Memory Map and select attributes for “FULLFLASH”:
    R   W   X    Volatile
   [x] [ ] [x]     [ ]
It is very important to UNCHECK W checkbox, since this directly affects the result of decompilation.
Step 3: Setup analysis settings
- Click
Analysis -> Auto Analyse -
Change analysis settings:
Disable:
- Disable
Embedded media. - Disable
Non-returning functions - discovered. This seems to cause disassembly to stop in a lot of places it shouldn’t. - Disable
Create Address Tables. This seems to be better as a one-shot after initial analysis, to avoid creating data from runs of things that could be addresses. - Disable
Demangler GNU.
Enable:
- Enable:
Scalar operand references. - Enable:
Shared return callswith[x] Allow conditional jumps.
- Disable
- Click “APPLY”. DO NOT CLICK “ANALYZE”!!!
- Close analysis window.
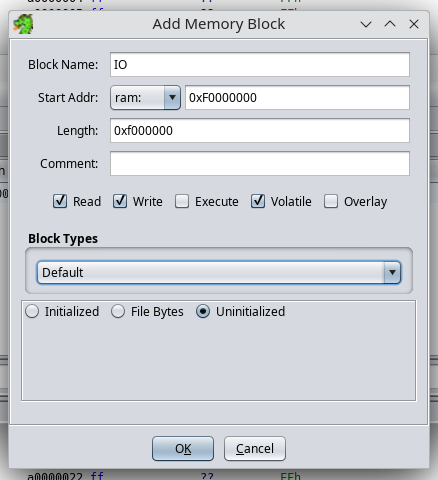
Step 4: Define IO memory region
- Click
Window -> Memory Map - Add a new memory region with given settings:
- Block Name:
IO - Start Addr:
0xF0000000 - Length:
0x0F000000 - Attributes:
[x] Read [x] Write [ ] Execute [x] Volatile [ ] Overlay - Uninitialized
Screenshot
- Block Name:
Step 5: Import memory dumps from your phone
You should import all memory dumps which you previously made (RAM memory dump).
Example with RAM:
- Click
File -> Add to Program - Select your dump file, for e.g.
C81v51_RAM_A8000000_00800000.bin. - Select apropriate settings:
- Options -> Block Name:
RAM - Options -> Base Addr:
0xA8000000
And click “OK”.
- Options -> Block Name:
-
Click
Window -> Memory Mapand select attributes for “RAM”:R W X Volatile [x] [x] [x] [ ]
Step 6: Install required Ghidra Scripts
Screenshot
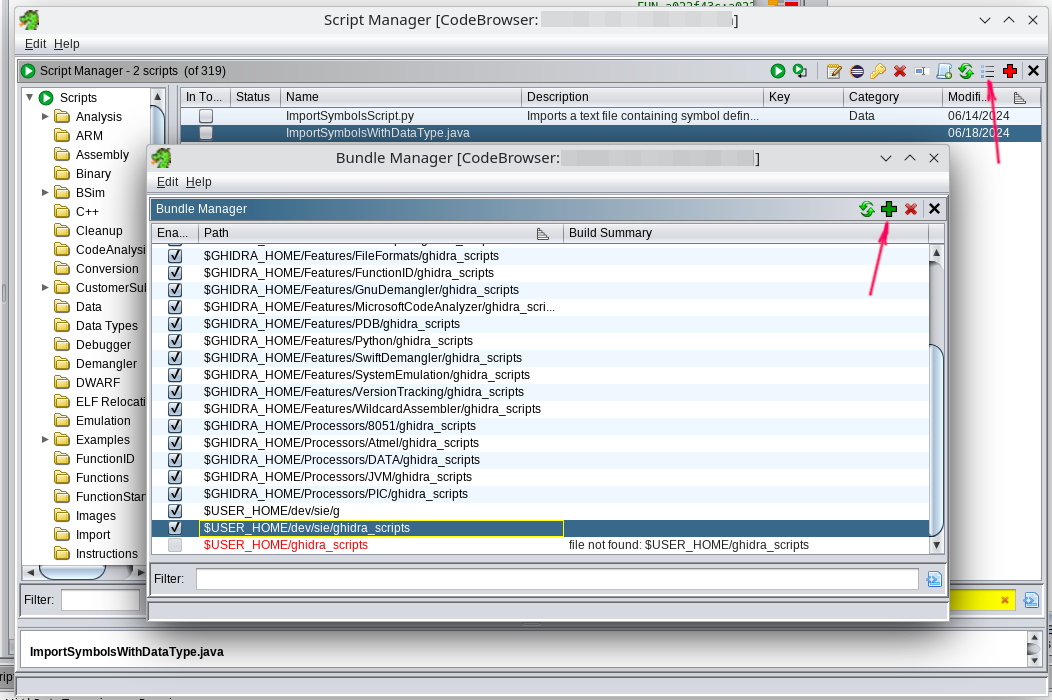
- Download: ghidra_scripts.zip (or clone repo)
- Go to the
Window -> Script Manager - Click “Manage Script Directories” icon.
- Add path to the dir with extracted
ghidra_scripts.zip.
Step 7: Import swilib C types
Screenshot
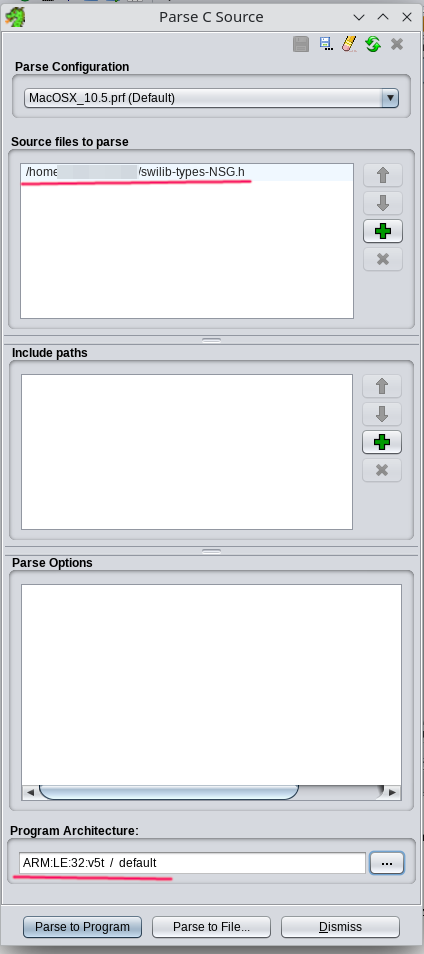
- Download appropriate
swilib-types-PLATFORM.hfrom the Swilib data types for dissasembler. - Click:
File -> Parse C Source... - Click
Clear profile(eraser icon). - Add your
swilib-types-PLATFORM.hto the “Source files to parse”. - Select “Program architecture” to
ARM v5t 32 little. - Click
Parse to Program -> Continue -> Don't use Open Archives -> OK
Step 9: Import CPU IO registers
- Download appropriate
cpu-PHONE.txtorcpu-pmb887x.txtfrom the CPU IO registers. - Click
Window -> Script Manager -> ImportSymbolsWithDataType.java -> Run Script - Select your
cpu-PHONE.txtorcpu-pmb887x.txt.
Step 10: Import swilib symbols
- Download appropriate
symbols-PHONE.txtfrom the Firmware symbols for dissasembler. - Click
Window -> Script Manager -> ImportSymbolsWithDataType.java -> Run Script - Select your
symbols-PHONE.txt.
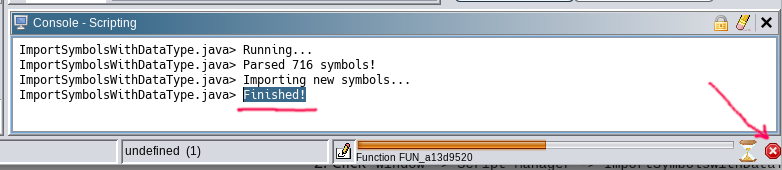
This will take a while because some auto-analysis has been started.
Once you see “Finished” in the Script Console - you can cancel this analysis process and go to the next step.
Screenshot
Step 11: Firmware analysis
Auto analysis
- Click
Analysis -> Auto Analyse 'fullflash.bin' - Check that the settings correspond to those previously specified in paragraph “Step 3: Setup analysis settings”.
- Click “ANALYSE”.
This will take a while (~1 hour), this is not a fast process. Be patient.
One-shot analysis
- Click
Analysis -> One-shot -> Create Address Tables